Creating Git Credentials
This guide explains how to create and use Git credentials for deploying private repositories to Clue2App, using either the Console UI or the CLI.
Creating a GitHub Personal Access Token
Before adding credentials to Clue2App, you need to create a Personal Access Token (PAT) on GitHub.
Fine-Grained Tokens (Recommended)
-
Go to GitHub Settings → Developer settings → Personal access tokens → Fine-grained tokens
-
Click "Generate new token"
-
Configure your token:
- Token name:
clue2app-deploy(or any descriptive name) - Expiration: Choose based on your security requirements
- Repository access: Select "Only select repositories" and choose the repos you want to deploy
- Token name:
-
Required permissions (under Repository permissions):
Permission Access Level Why it's needed Contents Read-only To clone and read your source code Metadata Read-only Required for all tokens (auto-selected) -
Click "Generate token" and copy the token immediately (it won't be shown again)
Classic Tokens (Alternative)
If you prefer classic tokens:
- Go to GitHub Settings → Personal access tokens (classic)
- Click "Generate new token (classic)"
- Select the
reposcope (Full control of private repositories) - Generate and copy the token
- Fine-grained tokens (recommended): More secure, scoped to specific repos
- Classic tokens: Simpler setup, broader access
- Never commit tokens to your repository
- Store tokens securely
- Rotate tokens periodically
- Use fine-grained tokens with minimal permissions when possible
Using the Console UI
1. Navigate to Git Credentials
From the Advanced menu, click on Git Repositories to access the Git credentials management page.
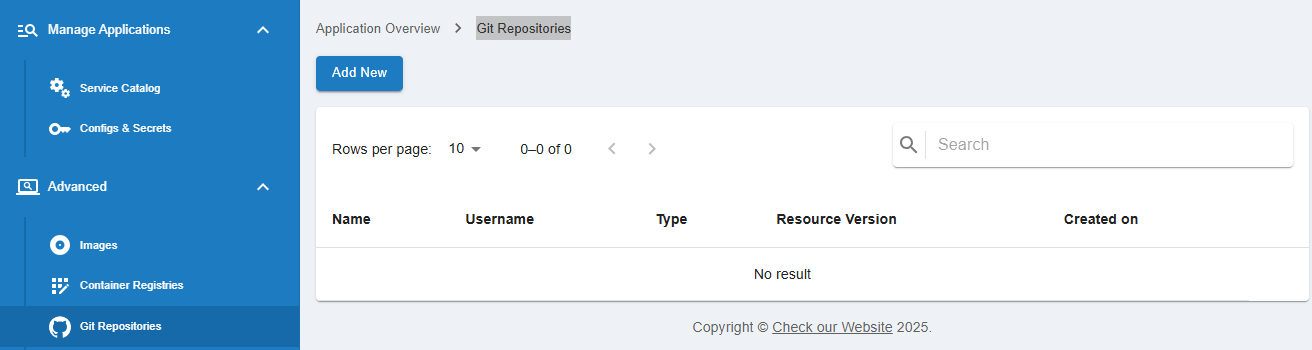
2. Create New Credentials
Click on the Add New button to open the credential creation dialog.
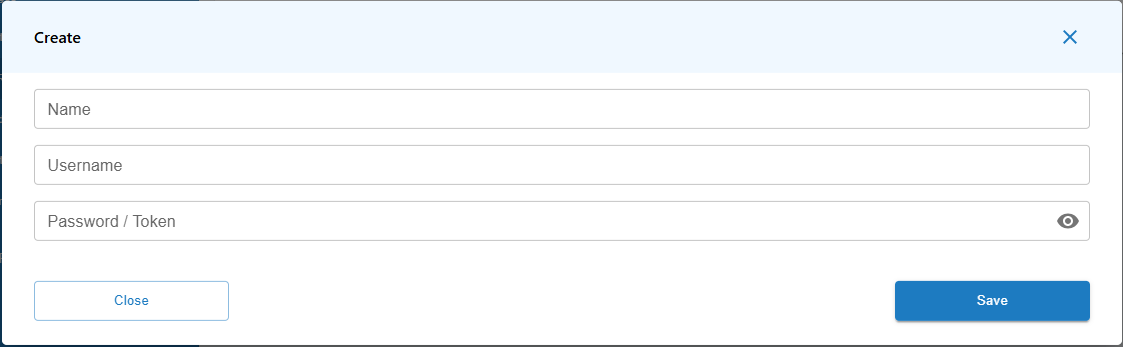
3. Fill in Credential Details
In the dialog, enter the required details:
- Name: A name to identify your credentials (e.g.,
my-github-creds) - Username: Your GitHub username
- Password / Token: The Personal Access Token you created above
4. Save Your Credentials
Click the Save button to store your credentials. The modal window will close, and you'll see your newly created credentials displayed in the list.
5. Using the Credentials in a New Application
When creating a new application, you can directly select these credentials from the dropdown menu in the Source Code Info section.

6. Create Credentials On-the-Fly
If you need to create new credentials directly from the project creation page, select Private under Git Access Type, and choose New credentials from the dropdown. This will allow you to enter your credentials on the fly.

Using the CLI
Option 1: Automatic (Using GitHub CLI)
If you have the GitHub CLI installed and authenticated, the Clue2App CLI will automatically use your credentials:
# First, authenticate with GitHub CLI (one-time setup)
gh auth login

# Then create your app - credentials are detected automatically
c2a apps create my-private-app \
  --git-url https://github.com/myorg/private-repo.git \
  --branch main
Option 2: Explicit Credentials
Provide credentials directly when creating an app:
c2a apps create my-private-app \
  --git-url https://github.com/myorg/private-repo.git \
  --branch main \
  --git-username your-github-username \
  --git-token ghp_xxxxxxxxxxxxxxxxxxxx
Option 3: Using Environment Variables (Recommended for CI/CD)
For better security, especially in automated pipelines:
export GIT_USERNAME="your-github-username"
export GIT_TOKEN="ghp_xxxxxxxxxxxxxxxxxxxx"

c2a apps create my-private-app \
  --git-url https://github.com/myorg/private-repo.git \
  --branch main \
  --git-username $GIT_USERNAME \
  --git-token $GIT_TOKEN
Troubleshooting
"Authentication failed" Error
- Verify your token hasn't expired
- Ensure the token has the correct permissions (Contents: Read)
- Check that the token has access to the specific repository
"Repository not found" Error
- Confirm the repository URL is correct
- For fine-grained tokens, verify the repository is included in the token's repository access
Token Expired
- Generate a new token following the steps above
- Update your credentials in the Console UI or use the new token with the CLI